
Mastering screen recording detection in iOS Apps
The other day, I got a bug report from a real user, complete with all the right details—description and a screen recording. But there’s one small issue: no clue which version of the app it’s from. So, I decided to add an overlay showing the app version and build number during screen recording or when taking a screenshot. Sounds simple, right? I remember there are some notifications for that—just subscribe, show/hide the overlay, and done! Shouldn’t take more than 30 minutes, right? Well, it turned out to be way trickier than I expected!
🚨
If you’re eager to try it out, here’s a link to the library and projects for both SwiftUI and UIKit. Just remember—use at your own risk! 📦 Library and demo project.
Apple allows tracking screen recordings — no surprises here. Here’s your event in Notification Center, and here’s your flag in UIScreen. But things aren’t so great with screenshots: there’s only a notification that a screenshot was taken, which comes *after* the fact. Meaning, there’s no way to prepare ahead of time. I thought, “What the heck, I’ve definitely seen apps that instantly swap views when a screenshot is taken!” (spoiler: nope, I didn’t, false memory)
struct ContentView: View {
    @State private var isScreenCaptured = false

    private let center = NotificationCenter.default

    var body: some View {
        ZStack {
            Text("Main Content")

            if isScreenCaptured {
                Text("Screen Recording in Progress")
                            .foregroundColor(.white)
            }
        }
        .onReceive(center.publisher(for: UIScreen.capturedDidChangeNotification)) { _ in
            // ⚠️ Deprecated в iOS 18+, it's better to use `sceneCaptureState`
            isScreenCaptured = UIScreen.main.isCaptured
        }
        /// You can also subscribe to`UIApplication.userDidTakeScreenshotNotification`
        /// but notification is sent after screenshot is taken
        /// there's no way to prepare ahead of time
    }
}
Good artists copy, great artists steal
I definitely remember Telegram hiding messages in screenshots in secret chats. All I need is to figure out what events they catch and what they do to hide it. Hopefully, the iOS client is open sourced. Let’s go! Git clone, grep ‘screenshot’. About 20 minutes later, I dig up this method called setLayerDisableScreenshots in UIKitUtils.m, which uses an internal UITextField view to make any layer hideable on any screen capture, whether it’s a screenshot or a video recording.
Basically, it “buffs” any layer and lets it disappear during recording. But how does it work? Some event must be triggering the layer to hide. To save time on experiments, I decided to open good ol’ Hopper Disassembler and dig into UIKitCore.
☝🏻
To quickly find the path to the right framework, just set a breakpoint somewhere in your Swift code and run po Bundle(for: UIView.self). Replace `UIView` with whatever class you need.
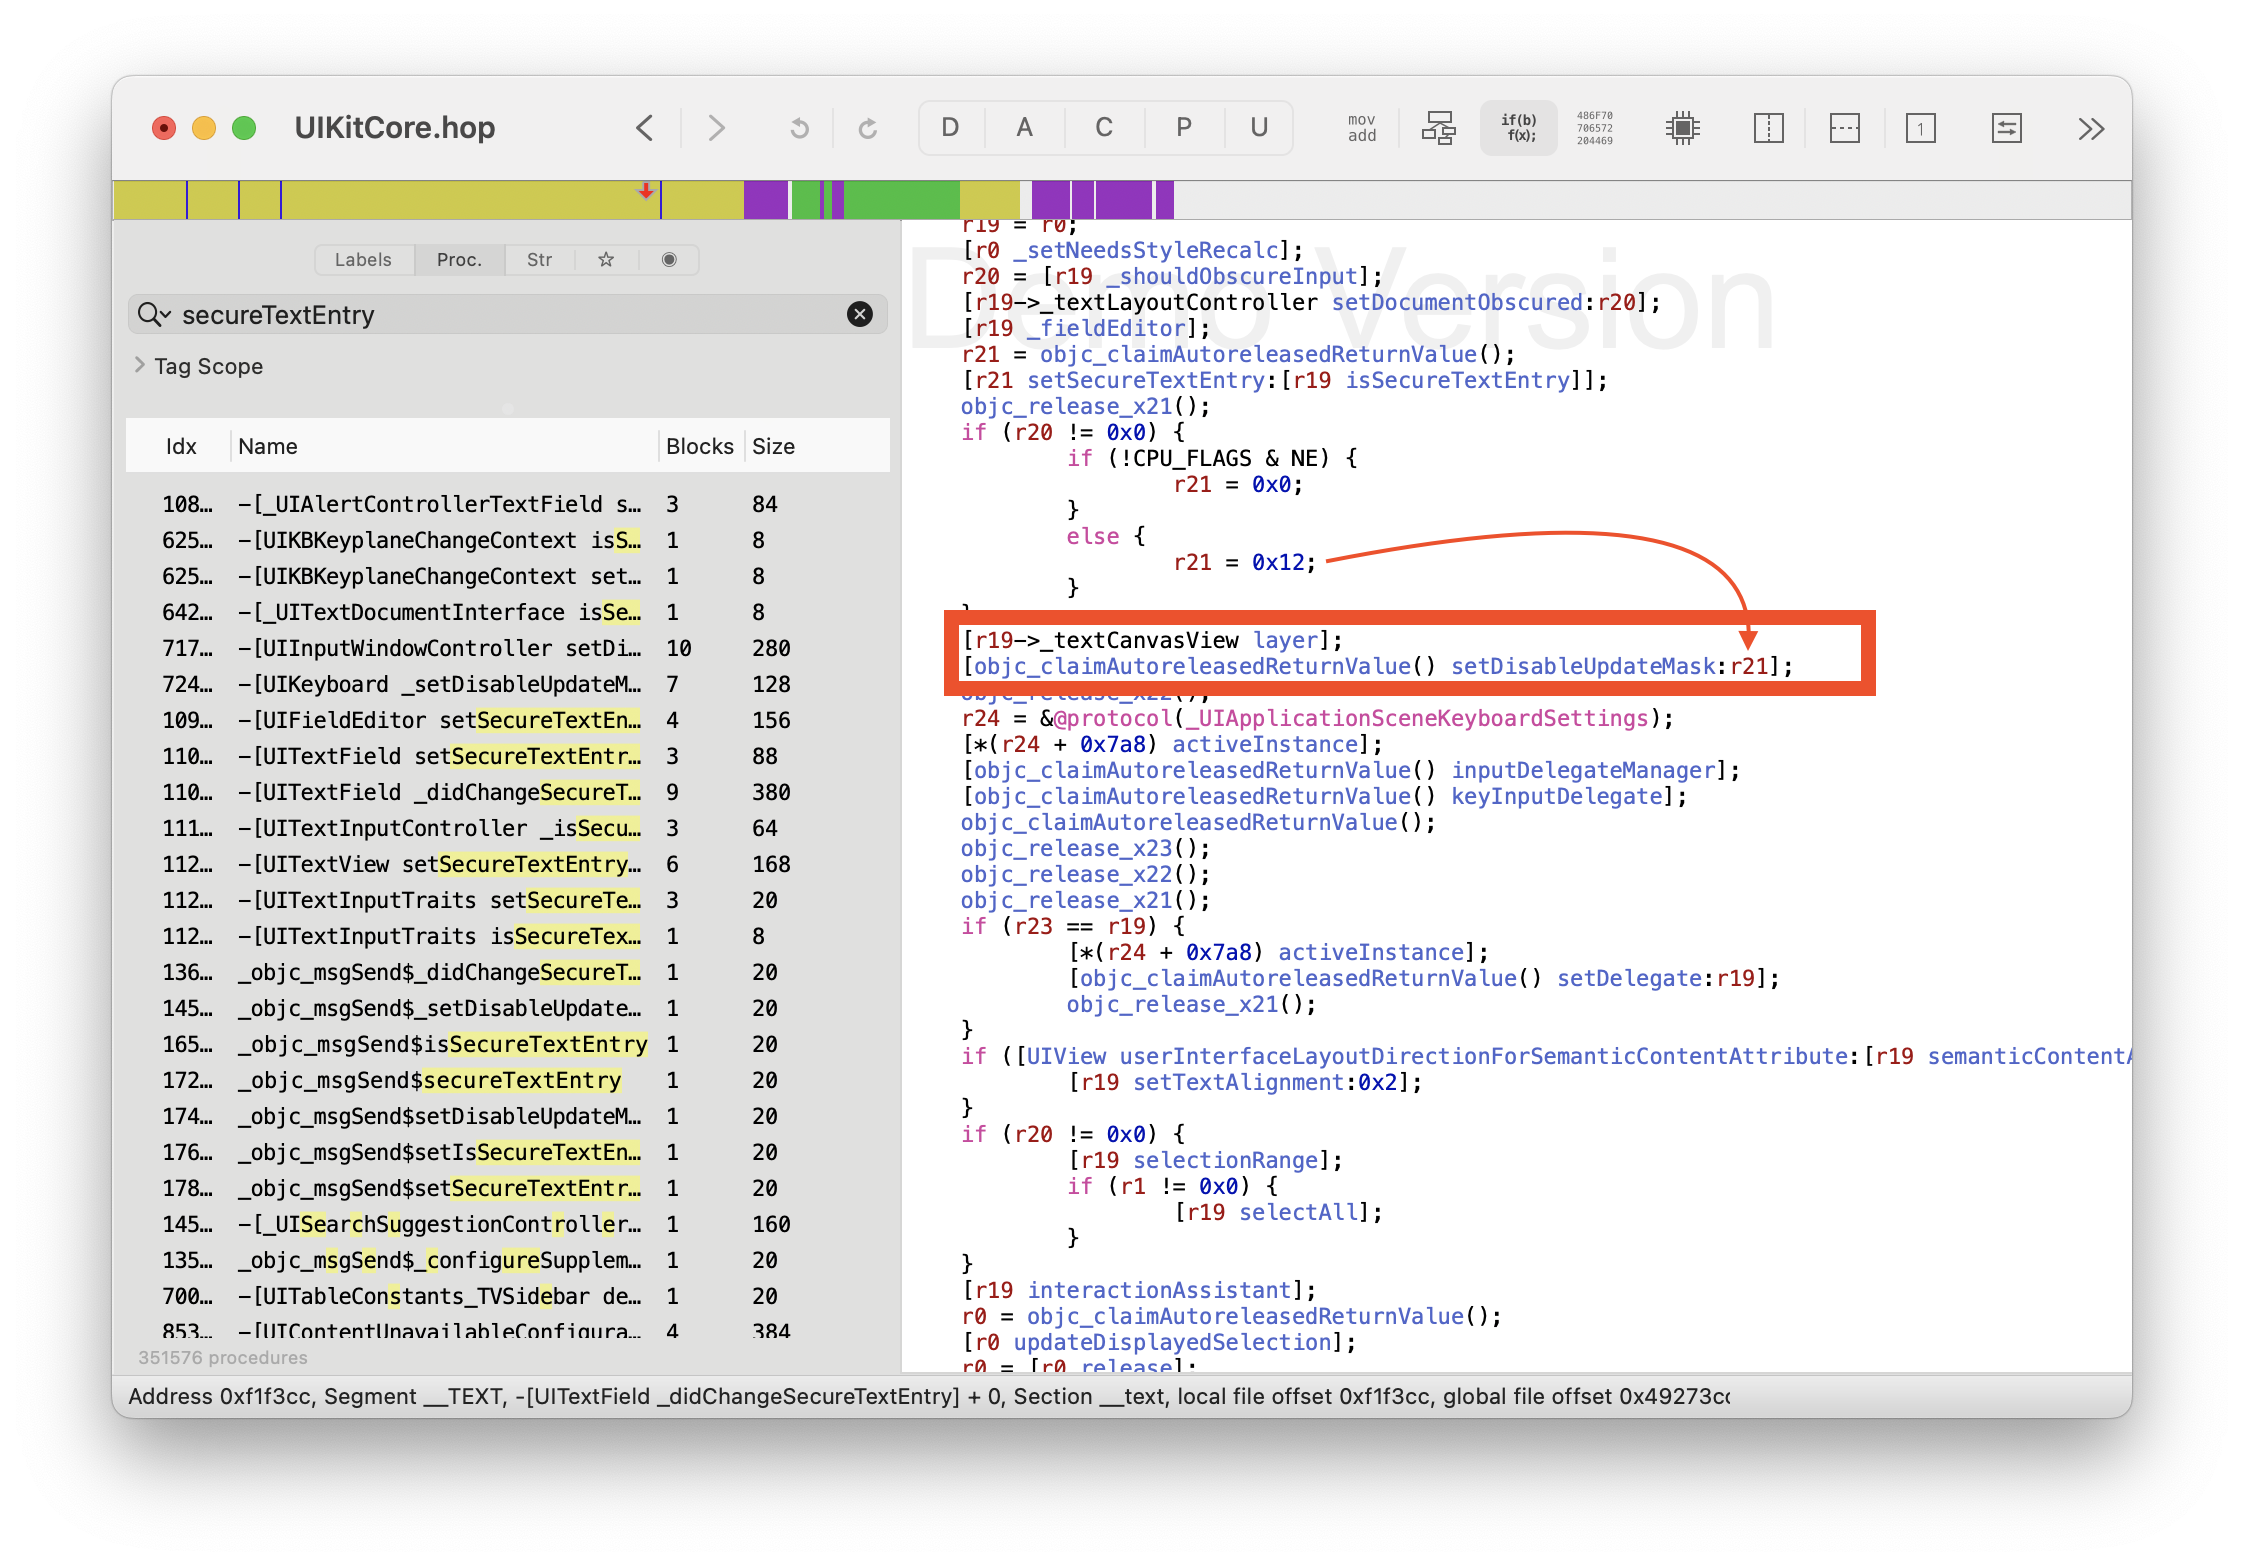
So, the digging leads to this conclusion: there really aren’t any events. When you set isSecureTextEntry, the text field gives the layer of the internal container some special attributes (disableUpdateMask), which are sent to the render server. Then it decides whether to draw the view or not. Well, makes sense, it’s secure. This way, secure fields won’t be drawn even if the app freezes and the main thread stops responding. Or if the app in background and run loop is suspended.
⚠️
Even though we can clearly see the flag value 0x12 here, it’s not a good idea to rely on it. On my iOS 18, it works only half the time, so I stuck with the Telegram solution — it works like a charm!
Here is swift adaptation of Telegram’s approach:
import UIKit

private let uiKitTextField = UITextField()
private var captureSecuredView: UIView?

public extension CALayer {
	func makeHiddenOnCapture() {
		let captureSecuredView: UIView? = captureSecuredView
			?? uiKitTextField.subviews
				.first(where: { NSStringFromClass(type(of: $0)).contains("LayoutCanvasView") })

		let originalLayer = captureSecuredView?.layer
		captureSecuredView?.setValue(self, forKey: "layer")
		uiKitTextField.isSecureTextEntry = false
		uiKitTextField.isSecureTextEntry = true
		captureSecuredView?.setValue(originalLayer, forKey: "layer")
	}
}
Implementing it in SwiftUI
Since I needed to solve this in a SwiftUI project, just hiding UIKit layers wasn’t enough. My first idea was to use masks. Like, you take a ZStack, draw a black and white view in there, where the black one is a UIViewRepresentable with a hideable layer. Let’s code it up:
struct HiddenOnCaptureColorView: UIViewRepresentable {

	let color: UIColor

	func makeUIView(context: Context) -> UIView {
		let view = UIView()
		view.layer.makeHiddenOnCapture()
		updateViewColor(view: view)
		return view
	}

	func updateUIView(_ uiView: UIView, context: Context) {
		updateViewColor(view: uiView)
	}

	func updateViewColor(view: UIView) {
		view.backgroundColor = color
	}
}

struct VisibleOnlyOnCaptureModifier: ViewModifier {
	func body(content: Content) -> some View {
		content.mask {
			ZStack {
				Color.black
				HiddenOnCaptureColorView(color: .white)
			}
		}
	}
}
But here’s the catch — I forgot that masks don’t work with black/white colors, but with transparent/opaque pixels. What to do? A quick Google search didn’t help, but ChatGPT had my back — there’s this method on View called luminanceToAlpha(), which blends the pixels, making black ones transparent and white ones opaque. I couldn’t believe it would work, but it actually did!
struct VisibleOnlyOnCaptureModifier: ViewModifier {
	func body(content: Content) -> some View {
		content.mask {
			ZStack {
				Color.black
				HiddenOnCaptureColorView(color: .white)
			}
			.compositingGroup()
			.luminanceToAlpha()
		}
	}
}
Yay! It turned out to be easier than I thought! Just swap the colors, and you get a view that’s either visible in a screenshot or hidden.
⚠️
This only works on a real device though, you can’t pull this off in a simulator, and UI tests won’t work either. Keep that in mind.
⚠️
Since we’re manipulating masks here, they don’t affect the layout at all. Remember, they work like the alpha modifier — they are factored into the layout calculation but just hidden or shown during screen recording.
Another Half-Day Adventure

By this point, I had already posted on my Telegram channel and decided to write this article. I just needed full support for UIKit. Hiding views there is easy, but showing them…
Again, it seemed simple — subclass the view, apply a mask to the layer, and done! I set up a working experiment — and nothing worked. Once again, I forgot that views need to be transparent/opaque, not black/white. But how do I get the luminanceToAlpha effect? UIKit doesn’t have that.
Going Deeper
I was about to give up, but my curiosity wouldn’t let it go. How could this be? I managed it in SwiftUI, but not in my good ol’ UIKit!
So, I decided to check out the View Hierarchy. I launched a minimal SwiftUI app and took a look at what kind of “kit” views it draws, since all SwiftUI views eventually turn into layers that are sent to the render server.
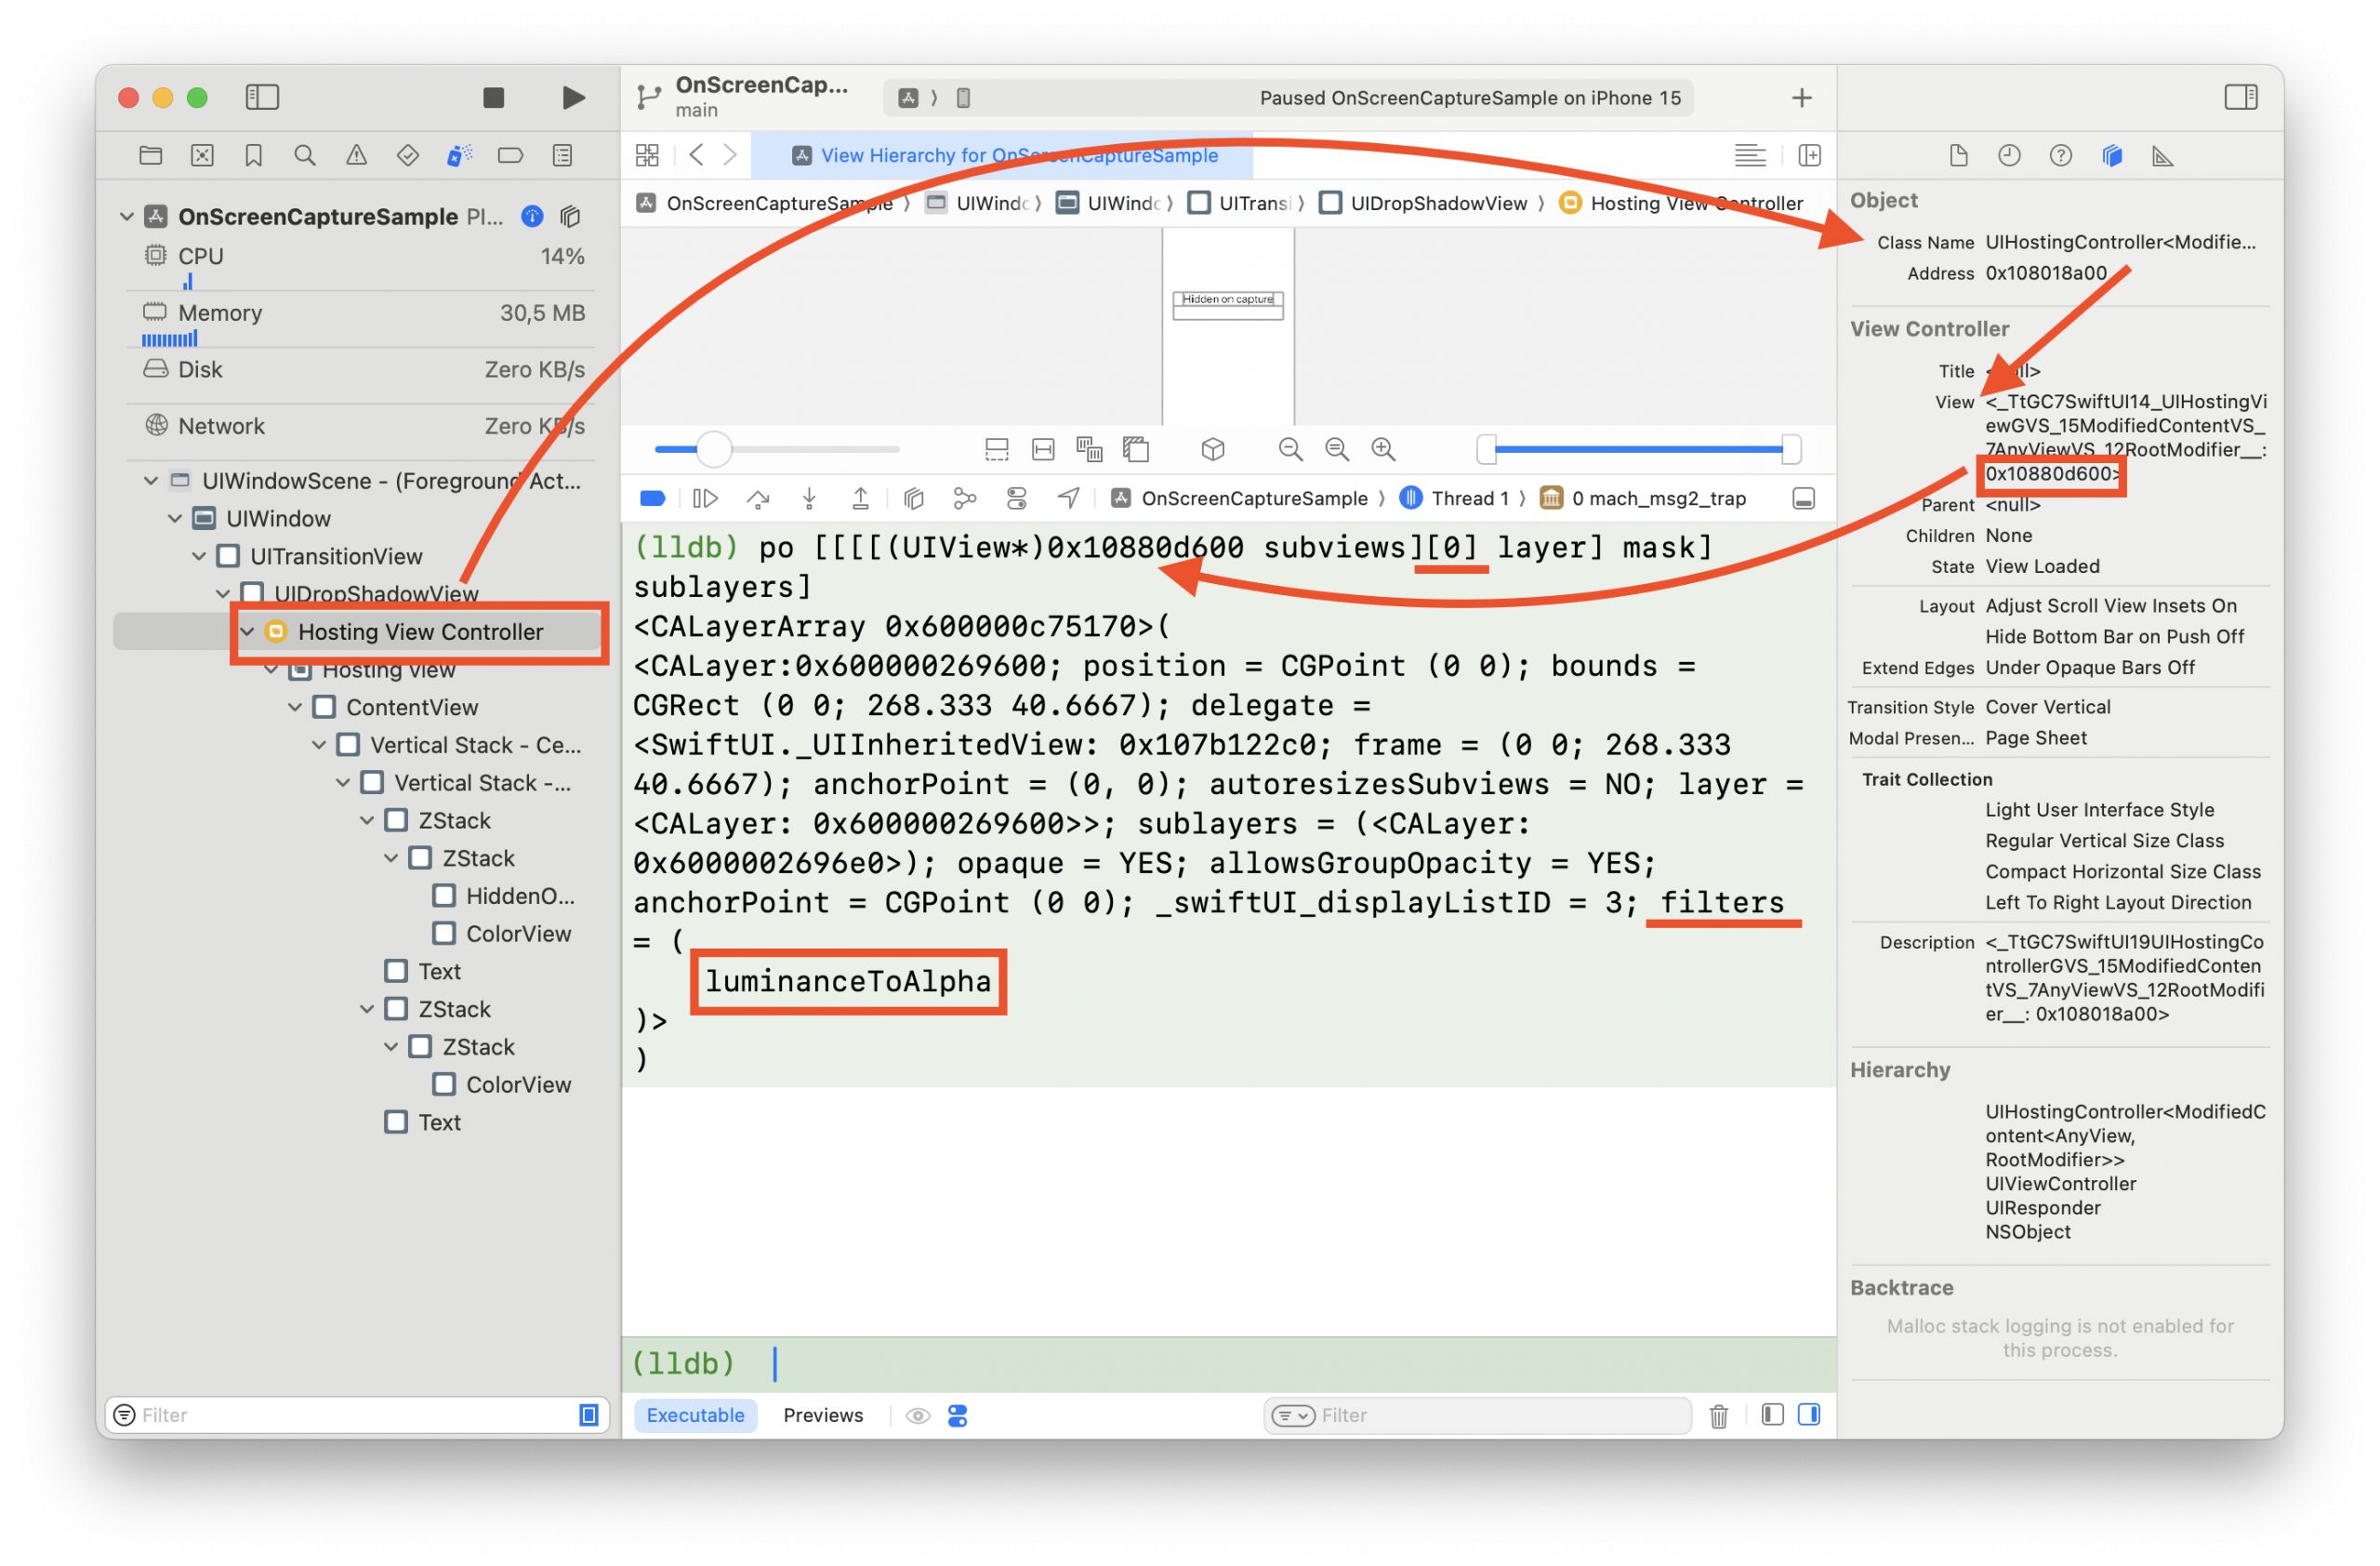
I won’t go through my entire view tree traversal, but pretty quickly, I found exactly what I needed. There it was — my view, with a mask, containing two layers and a FILTER with the name luminanceToAlpha! Awesome!
All that was left was a bit of private ObjC magic, and we’re good to go. So, what we need is a layer with two sublayers (one black and one white), where one is prepped to hide during screenshots, and the parent will mix them using the filter. This is a special private CAFilter (not to be confused with CIFilter), which isn’t easy to access. But, thanks to Objective-C runtime magic — no Hogwarts required — we can pull it off!
func makeFilter() -> NSObject? {
	guard let filterClass: AnyClass = NSClassFromString("CAFilter") else { return nil }
	let selector = Selector("filterWithName:")
	typealias Function = @convention(c) (AnyClass, Selector, String) -> AnyObject?

	guard let filterWithName = class_getClassMethod(filterClass, selector) else { return nil }

	let implementation = method_getImplementation(filterWithName)
	let function = unsafeBitCast(implementation, to: Function.self)

	guard let filter = function(filterClass, selector, "luminanceToAlpha") as? NSObject else { return nil }
	return filter
}
Victory!
Great, I achieved what I wanted and even more. I wrapped it all up in a 📦 SPM package, which you can use in your project. It has two targets — one for SwiftUI and one for UIKit. The SwiftUI version is safe to use, as there are no private symbols involved. But with the UIKit version, you need to be extra cautious because of the CAFilters. It’s nothing too risky, but it’s better not to use it directly. Instead, you can take a look at the solution and maybe obfuscate the symbols before releasing it to the App Store.